
Your cart is currently empty!
Grab & Go: The Ultimate Emergency Go Bag Checklist
•
Imagine the power goes out, alarms start blaring, or a sudden alert makes your family rush. In these moments, a pre-packed emergency go bag is more than just a kit—it’s a lifeline. It’s a ready-to-grab collection of essentials to keep you safe for at least 72 hours. Think of it as your family’s safety net against the unknown.
We’ve all seen families running from wildfires or floods with just their suitcases. Don’t let that be your story. A well-stocked go bag is not about fear—it’s about love. It’s a “just in case” hug for you and your loved ones. Emergency preparedness begins with one simple step: pack a bag today. Whether it’s a hurricane, blackout, or an unexpected road trip, your go bag will be your best friend. In this guide, we’ll show you how to build the ultimate emergency go bag step by step. We’ll cover everything from essential items to smart organization tips. This way, you can face any crisis with calm, not chaos. So, you’re never left scrambling when disaster strikes. Ready to turn “what if?” into “we’re ready.” Let’s get packing.
Understanding the Emergency Go Bag Concept
Imagine a storm warning on your phone, and you have just minutes to decide what to grab. That’s when a well-packed go bag comes in handy. Unlike a random emergency kit essentials pile, a go bag is ready to go without any last-minute scrambling. It’s like your family’s lifeline, packed thoughtfully so it’s always by the door.
What Defines a True Emergency Go Bag
- Portable: fits under the bed or by the exit
- Complete: includes emergency readiness tips like first aid, water, and a flashlight
- Personalized: adapts to your family’s needs—like extra diapers or prescription meds
It’s not just stuff—it’s a promise of calm in chaos. We’ve seen friends pack “kits” only to realize during an evacuation they’d forgotten the charger for their flashlight. That’s why we stress the “ready-to roll” mindset.
The Psychology of Emergency Preparedness
“The peace of mind is worth more than the stuff inside.” – Maria, a Houston family who evacuated Hurricane Harvey
Preparing isn’t just about supplies—it’s about trust. When disaster strikes, knowing your bag has a map, cash, and a list of meeting spots. Emergency readiness builds confidence. Studies show families who practice emergency drills sleep better. It’s like having a safety net woven into daily life.
Historical Examples of Go Bag Effectiveness
In 2018, California wildfire survivors like the Gonzales family credited their go bags for keeping medications and photos safe. During Hurricane Katrina, having a charged radio and bottled water in a grab-and-go bag meant faster reconnections with loved ones. These stories remind us: preparation isn’t just practical—it’s love in action.
Why Every Household Needs an Emergency Go Bag
Life’s surprises are unpredictable. Emergencies like hurricanes or power outages can happen anytime. That’s where your emergency response kit comes in. Did you know over 40% of U.S. households face disruptions every year?
Think of floods, fires, or snowstorms like the one that stranded the Johnsons. When the power went out for five days, their emergency preparedness items kept their kids safe and warm.
Many of us think, “That’ll never happen to me.” But the truth is, 60% of families without a go bag struggle to recover after disasters. It’s not about fear—it’s about peace of mind.
Imagine a wildfire forces an evacuation. Those extra minutes spent scrambling for supplies? Gone. Your emergency response kit lets you focus on what matters most—your family.
Building this kit is easy. Start with a flashlight, water, and first aid. Then add documents, snacks, and a family plan. Every item is a safeguard, turning panic into possibility. It’s not just about survival—it’s about keeping life’s rhythm steady when the world feels off-kilter.
So why wait? A go bag isn’t a doomsday tool. It’s a hug in a backpack, ready to say, “We’ve got this.” Ready to make your kit as cozy as a well-packed picnic? Let’s get started—together.
Natural Disasters: Hurricanes, Floods, and Wildfires
Coastal families in Florida face hurricanes with disaster survival gear. Waterproof pouches and emergency blankets keep important documents safe. In wildfire zones, masks and evacuation kits help people escape smoke-filled roads. You can and should curtail the go bag to your area.
- Hurricanes: Keep passports and cash in sealed containers.
- Floods: Store extra shoes and dry clothes above waist height.
- Wildfires: Include N95 masks and a portable radio for updates.
Man-made Emergencies: Power Outages and Civil Unrest
When the power goes out, your go bag’s flashlight and radio are essential. In 2021’s Texas winter storm, families used stored water and first-aid kits to survive. During civil unrest, an updated emergency evacuation planning checklist helped keep families calm.
“A go bag isn’t about fear—it’s about knowing your family’s got a fighting chance.” — FEMA Community Outreach Team
Personal Emergency Situations
It’s not always big disasters. Sometimes, it’s a sudden gas leak, a child’s asthma attack, or a house fire. Having medications, a fire extinguisher, and snacks in your bag is crucial. Remember, the best disaster survival gear is what you’ve tested with your family. Practice a quick grab-and-go drill once a year. It strengthens your bond and is affordable.
Selecting the Optimal Bag for Emergency Situations
First, think about your bag’s shape. Backpacks are great because they let you keep your hands free. Duffels are good for packing a lot, but they might hurt your shoulders if you have to walk a long way. Rolling luggage is easy to move on flat paths, but what if the roads are blocked?

When it rains or winds up, the bag’s material is crucial. Look for water-resistant nylon or coated fabrics. Brands like Osprey or eBags offer good options without costing too much. Stay away from flimsy plastics. You want your emergency supply checklist to stay dry and safe.
When it comes to weight, aim for 20-30 lbs for adults. Kids should carry less. Here’s how to divide the load:
- Backpacks: Spread the weight with padded straps
- Duffels: Use a waist strap for support
- Rolling: Pick compact wheels for rough terrain
Your go bag should be:
-
Durable & Lightweight – Easy to carry and weather-resistant.
-
Spacious with Compartments – Helps keep things organized.
-
Comfortable to Wear – If you need to walk long distances, choose a backpack with padded straps.
Your bag should move with you, not hold you back. Try it out for 10 minutes. Does it rub or hold everything you need? Great! You’re all set for emergency go bag organization.
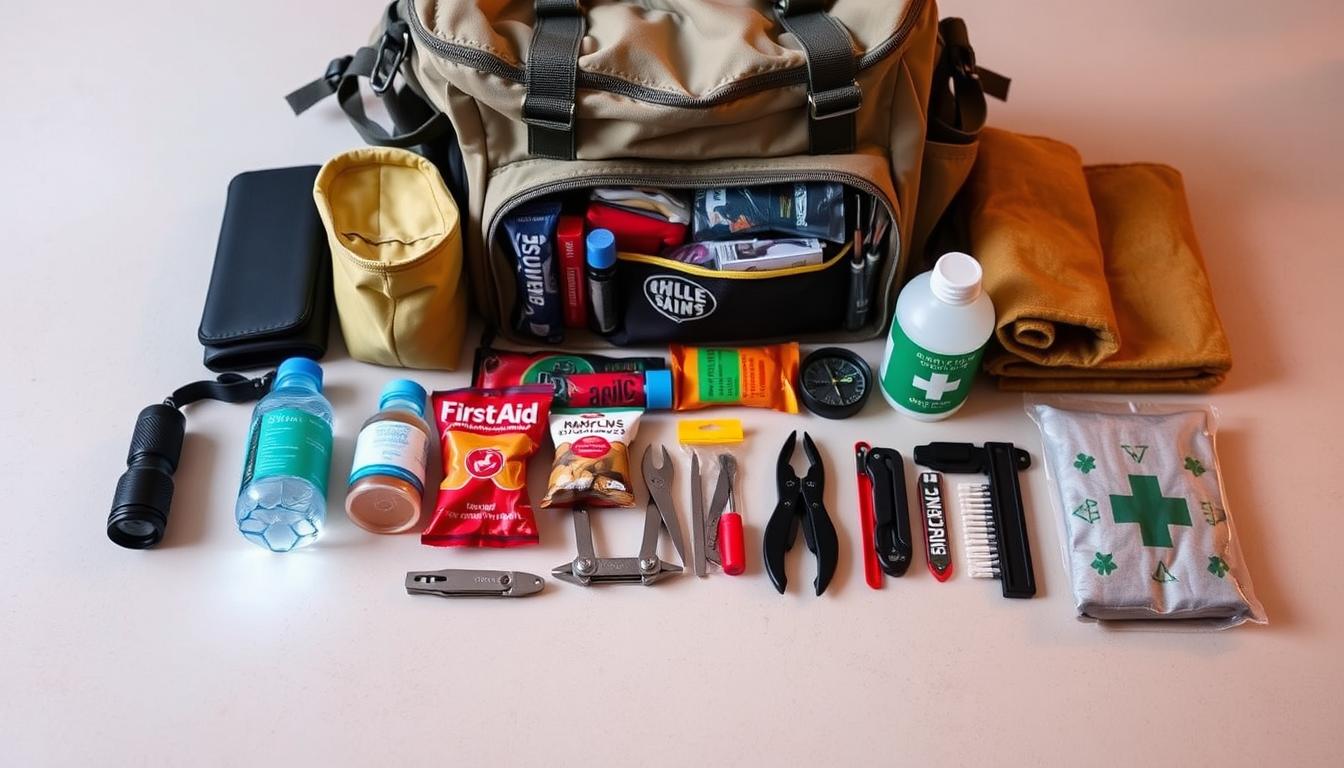
Grab & Go: How to Build the Ultimate Emergency Go Bag with Core Essentials
Creating an emergency go bag doesn’t mean turning your garage into a bunker. It’s about making smart, practical choices that fit your life. We’ll cover the six categories every family needs to be ready for anything. No need for doomsday prepping, just real solutions for real moments.
- Documents & Cash
- Keep physical copies of ID, insurance, passport, social security card, wills, medical cards, and birth certificates in waterproof bags (this could be a ziplock type bag).
- Emergency contact list (printed and digital)
- Make digital backups on USB drives or secure cloud storage.
- Have a small cash stash ($50–$100 in small bills) and credit card copies.
- Water & Food
- Stock up on 3 days’ worth of bottled water at least 1 liter/person/day(1 gallon/person/day is ideal).
- Water purification tablets or a portable water filter like a life straw.
- Include non-perishables like energy bars, nuts, MRE’s, and electrolyte packets.
- Light-weight utensils and a can opener.
- C. Clothing & Shelter
- Compact rain ponchos, thermal blankets, and moisture-wicking layers.
- Compact emergency blanket.
- Weather appropriate clothes (change out for the season).
- Sturdy comfortable shoes.
- Extra socks and underware.
- Bring quick-dry towels
- Tent and multi-use tarps for shelter.
- D. First Aid & Hygiene
- Have a Red Cross-approved first aid kit with gloves, bandages, antiseptic wipes, and pain relievers.
- A weeks worth of medications.
- Female hygene prodcuts
- Deodorant, hand sanitizer, wet wipes, and a travel toothbrush.
- E. Tools & Safety Gear
- Carry a multi-tool with pliers, knife, and scissors.
- Duct tape (multiple uses).
- Self-defense items like pepper spray and personal alarm.
- N95 masks (for dust, smoke, and debris).
- Bring an emergency whistle, LED flashlight, and waterproof matches.
- F. Communication & Navigation
- Fully charged portable charger, battery-powered radio, and emergency contact cards.
- Carry printed maps and a compass for backup.
“When the flood hit, all we had was a folder with copies of insurance policies and IDs—it made a chaotic time manageable,” says the Johnson family, who rebuilt their home using their organized emergency kit essentials.
Begin with one category a week. Use compression sacks to save space. Remember, this isn’t just a bag—it’s peace of mind for the road ahead.
Documentation and Financial Preparedness
Let’s talk about the paperwork that could save your family’s sanity during chaos. Organizing documents isn’t as fun as packing a shiny new flashlight. But, it’s the foundation of emergency preparedness. Imagine needing to prove who you are—or access critical info—when disaster strikes. That’s where this section steps in.
Start with your emergency supply checklist for papers. Physical copies of IDs, birth certificates, and insurance policies should be sealed in waterproof bags. Digitally, encrypt files on a USB drive or use secure cloud storage. I’ve heard of a family who avoided rental scams post-hurricane by having digital deeds on a password-protected drive—genius!
“Cash was our lifeline when ATMs failed. Small bills made all the difference.”
– The Carter Family, Texas Flood Survivors
Next: cash. Include $1-$20 bills—$50s might leave you stranded if no one can give change. Aim for $200-300 in total. Also, keep a list of bank account numbers and a list of contacts for financial institutions.
- Documents: IDs, insurance, medical records, property deeds
- Cash: $1–$20 bills, bank contact info
- Contacts: Emergency contacts on paper + offline apps like Google Maps’ “Save for Offline”
Wrap it all in a weatherproof folder and stash it in your go-bag. This small step turns panic into purpose—because knowing your family’s details are safe is the ultimate peace of mind.
Water and Nutrition Strategy for 72+ Hours
Let’s start with liquids—the most important item in your survival kit. Water is heavy, but skipping it is risky. We recommend using both emergency water pouches and bigger containers for better storage.
We’ve included items like LifeStraw filters and collapsible bottles. These help you find a balance between weight and usefulness.
- Store 1 gallon per person daily—3+ gallons total
- Include portable filters like Sawyer Squeeze for creek water
- Freeze half your water—keeps other items cold and melts for drinking
Food is the fun part, but nobody likes eating bad-tasting meals for days. We’ve tried everything from dehydrated meals to trail mixes. Our kids even like Mountain House meals because they taste good.
Choose snacks that are high in calories but don’t need cooking. Nuts and jerky are great for keeping energy up.
Remember to check your supplies every six months. Set a calendar reminder every six months to replace perishable items and change out clothes for the season.
Choose items that are both practical and family-friendly. This way, everyone stays happy and energized. Every meal should feel like a treat, not a burden.
- High-energy options: Clif Bars, trail mix, dried fruit
- Comfort foods: Instant oatmeal, canned chili, jerky
- Storage hacks: Vacuum-sealed Mylar packets for long-term freshness
Staying fed and hydrated is more than just survival. It’s about keeping your family’s spirits high. Mix emergency items with treats that remind you of home. A full belly brings hope.
Clothing and Shelter Components for Varying Conditions
When the world turns unpredictable, your clothing and shelter become your armor. Think of them as the unsung heroes of your emergency preparedness items. They are lightweight layers and compact shelters that adapt to any scenario. Families have thrived in storms and heatwaves by prioritizing these basics.

Start with all-weather clothing essentials that work as hard as you do. Layering is key: moisture-wicking base layers (think merino wool or synthetic blends) trap warmth while keeping you dry. Add insulating mid-layers like puffy jackets and top with waterproof shells. Pro tip: opt for quick-drying fabrics—they’re lifesavers after a flood or rainstorm.
“Our base layers saved us during that unexpected Colorado snowstorm. We’d packed nothing but cotton before—big mistake!”—Sarah, a mom of three who learned the hard way.
Portable shelter options come in sizes for every situation. Ultralight tarps offer instant shade and windbreaks; lightweight emergency bivvies shield you from the cold in a pinch. For families, invest in a 4-season tent rated for wind and snow—brands like MSR or REI have models under 3 pounds. Prioritize shelters that set up fast when time is critical.
Don’t forget sleeping solutions that don’t bulk up your bag. Foil emergency blankets pack free, while 20-degree sleeping bags from Therm-a-Rest or CampingAZ fit into a backpack. For budget-friendly options, thermal blankets paired with a sleeping pad work wonders for maintaining body heat.
Every layer and shelter item ties into your bigger preparedness story. It’s not just about survival—it’s about staying human when the world feels anything but. These pieces aren’t just gear; they’re your comfort blanket in chaos.
Comprehensive First Aid and Medication Planning
Creating a first aid section for your emergency response kit is easy. Start with the basics like bandages, antiseptic wipes, and pain relievers. Keep it simple but effective.
- Include tweezers for splinters or ticks
- Add a thermometer and instant cold packs
- Don’t forget calamine lotion for rashes
Prescription meds are a must. Talk to your doctor about a 7-day backup supply in your go bag. A family stored asthma inhalers during a 3-day blackout, saving lives when pharmacies were closed. Tell your pharmacist to rotate medications every 6 months to keep them fresh.
Hygiene supplies are key. Pack baby wipes, hand sanitizer, and sealed feminine care products. A travel-sized toothbrush and floss can boost mental health during emergencies. Use small ziplock bags to organize items like blister packs or ointments.
Lastly, include a first aid manual in simple language. Knowledge is power, like when a grandparent used a guide to splint a sprained ankle during a hiking emergency. Remember, preparation is about keeping your crew safe, not being a hero.
Essential Tools and Multi-Purpose Equipment
Lighting and tools are key in any emergency. They turn darkness into action. Look for items that do more than one thing, like a multi-tool that fixes leaks and opens cans. Check out this BC guide for examples.

Start with light. Headlamps let you move around without using your hands. A lantern with red light helps keep your night vision sharp. A tip from someone who survived Hurricane Sandy.
LED lanterns that charge via USB are great. They’re quieter than candles and safer than matches.
Lighting Options: Beyond Basic Flashlights
- Headlamps with red-light modes (great for reading maps)
- Portable lanterns with USB charging (try brands like Goal Zero)
- Chemical light sticks for no-battery backup
Muti-Tools and Essential Hardware
A good multi-tool (like Leatherman or Gerber) does it all. Add a compact shovel and duct tape for quick fixes. A small adjustable wrench is also handy for gas valve repairs.
Defensive and Safety Equipment Considerations
Safety gear doesn’t mean weapons. Use a whistle or loud noisemaker to signal for help. A fixed knife is useful for repairs and problem-solving. Always check local laws before adding sharp items.
Every tool should earn its place. Ask if it solves more than one problem. If yes, it’s worth the space. Keep your go bag simple for your comfort and budget.
Communication and Navigation When Infrastructure Fails
We’re all glued to our phones today. But what if the grid goes down? That’s when emergency communication tools become crucial. They’re part of your emergency evacuation planning. Knowing how to stay in touch without Wi-Fi is essential.
Stories of families reuniting with simple tools like handheld radios or flares are common. Let’s explore what works when technology fails.
Start with off-grid communication devices that don’t need charging. Hand-crank radios, like the Midland M-601, broadcast important updates. Satellite messengers, such as Garmin inReach, send SOS signals in remote areas.
Don’t forget the basics: FRS walkie-talkies for short-range chats. Remember to test devices monthly and store extra batteries in a emergency response kit. It’s less stressful than panicking during a blackout.
- Communication Essentials: Radios (e.g., Midland M-601), NOAA weather alerts)
- Satellite Backup: Garmin inReach Mini 2 for global SOS messages
- Local Talks: Motorola Talkabout walkie-talkies for 1-mile range
Navigation is next. A laminated road atlas and a compass never run out of battery. Use a GPS like the DeLorme inReach SE for mapping and messaging.
Mark evacuation routes on your map that bypass major highways. We’ve learned during wildfires that side roads save time.
Signaling gear isn’t just for movies. A mirror-flashlight combo reflects sunlight up to 10 miles. Flares or whistles grab attention fast. Practice matters. Run a drill with your family using your emergency response kit once a year. It builds confidence.
And if you’re building a kit from scratch, check out pro tips for budget-friendly gear that won’t break the bank.
Customizing Your Go Bag for Special Needs
Emergency preparedness means having a go bag that fits your life perfectly. Think about Grandma’s oxygen tank, your kid’s allergy meds, or your cat’s litter. These details are crucial.
We’ve covered the basics, but the real magic happens when you add your personal touches. Make sure insulin and EpiPens are easy to find. Include a favorite toy for comfort during tough times. And remember, pets need food, leashes, and vet records too.
Emergency go bag organization is all about you. Check your kit every six months. Swap out expired items, update baby formula, or add new prescriptions. The ready.gov/kit checklist can help you stay on track.
Did someone start chemo? Add a medical ID bracelet. Adopt a new puppy? Don’t forget poop bags and a leash. Every life change means it’s time to check your kit.
Every go bag should be tailored to personal needs. Consider:
For Families:
-
If you have kids, pack small toys, comfort items, diapers, formula if needed.
-
If you have pets, include food, water, leash, medical records, and collapsible bowls.
For Special Needs:
-
Extra eyeglasses or contact lenses
-
Medical devices and extra batteries
-
Notepad and pen for communication if needed
When emergencies strike, your customized bag will be your lifeline. It’s not just about supplies; it’s about peace of mind. Pack with love, check with care, and make your kit stronger with each update. We’re not just surviving; we’re protecting what’s most important. Stay ready, stay flexible, and keep those go bags as unique as your family.
10 Most Commonly Forgotten Go Bag Items
Even the most prepared individuals can forget key items. Here are some of the most commonly overlooked essentials:
-
Copies of Important Documents – Digital backups are great, but printed copies in a waterproof bag are a must.
-
Extra Phone Chargers & Power Banks – Your phone is a lifeline; keep it powered.
-
Local Maps & Compass – GPS may not be reliable in emergencies.
-
Cash in Small Bills – ATMs may be out of service, and small bills are easier for transactions.
-
Comfortable Walking Shoes – You may need to walk long distances.
-
Glasses or Contact Solution – If you rely on vision correction, don’t forget backups.
-
Emergency Whistle & Signal Mirror – Vital for signaling help in remote areas.
-
Multi-Purpose Soap – Can be used for bathing, laundry, and dishwashing.
-
Spare House & Car Keys – Keep an extra set in your go bag.
-
Notebook & Pen – Useful for communication, writing down instructions, or tracking information.
Final Tips
Don’t wait for an emergency to start packing. Set aside 30 minutes today to gather supplies and build your go bag. In times of crisis, preparation is your greatest asset.
Are you ready? Let’s get packing!