
Your cart is currently empty!
Make a Storybook-Inspired Medieval Writing Desk & Accessories
•
We’re excited to share with you a unique project that combines history, craftsmanship, and self-expression: creating a storybook-inspired medieval writing desk and accessories. With a little creativity and some basic crafting skills, you can create a one-of-a-kind writing space that adds a touch of medieval charm to your home. To get started, let’s explore how to make a storybook-inspired medieval writing desk & accessories, and discover the joy of diy medieval writing desk creation.
Imagine having a cozy, storybook-inspired medieval writing desk and accessories in your home, where you can write, read, and relax in a warm and inviting atmosphere. We’ll guide you through the process of creating this unique space, from selecting the right materials to adding the perfect decorative touches. Whether you’re a history buff, a book lover, or simply someone who appreciates the beauty of handmade craftsmanship, this project is sure to delight. Let’s begin our journey to create a storybook-inspired medieval writing desk and accessories, and make it a diy medieval writing desk project to remember.
As we embark on this creative adventure, we’ll explore the world of medieval writing desks and accessories, and discover the secrets of how to make a storybook-inspired medieval writing desk & accessories. From the materials and tools needed to the techniques and tips for getting started, we’ll cover it all. So, let’s get started and create a unique and functional writing desk that adds a touch of medieval charm to your home, with a diy medieval writing desk that’s all your own.
Capturing the Medieval Writing Desk Vision
As we delve into the world of medieval writing desks, we’re inspired by the storybook-inspired writing desk designs that evoke a sense of nostalgia and wonder. To create a medieval writing desk tutorial, we must first understand the medieval aesthetic and how to incorporate it into our design. This includes the use of wood, metal, and other materials that were characteristic of the time period.
A key aspect of medieval writing desks is their attention to detail and craftsmanship. By studying the history and design of these desks, we can gain a deeper appreciation for the skill and artistry that went into their creation. Whether you’re looking to create a medieval writing desk tutorial or simply want to learn more about these beautiful pieces of furniture, understanding the medieval aesthetic is essential.
Some notable features of medieval writing desks include intricate carvings, ornate metalwork, and a focus on functionality. By incorporating these elements into our design, we can create a storybook-inspired writing desk that is both beautiful and functional. With a little creativity and attention to detail, we can bring a touch of medieval charm into our homes and offices.
Essential Materials and Tools for Your Medieval Desk Project
The first step is gathering the necessary materials and tools. For a handmade medieval writing desk, you’ll need high-quality wood, such as oak or walnut, and metal hardware like hinges and locks.
A crucial aspect of creating medieval writing desk accessories is selecting the right materials. You can use wood, metal, or a combination of both to create unique and functional accessories like inkwells, quill holders, and paperweights.

To get started, you’ll need basic tools like a saw, drill, and sandpaper. Additionally, you can use specialized tools like a lathe or a chisel to add intricate details to your medieval writing desk and accessories.
Here are some essential materials and tools to consider:
- Wood (oak, walnut, or other hardwoods)
- Metal hardware (hinges, locks, and other decorative elements)
- Basic tools (saw, drill, sandpaper, and others)
- Specialized tools (lathe, chisel, and others)
1. Choose the Right Materials
Medieval furniture was typically made from solid wood like oak, walnut, or pine. Opt for:
- Reclaimed wood for an authentic, aged look.
- Live edge slabs for a more organic, fairy-tale feel.
- Stained or distressed wood to give it an aged, timeworn character.
2. Desk Design & Structure
The medieval aesthetic favors heavy, sturdy designs with intricate carvings. Consider:
- Trestle-style or gothic legs: Use thick, turned legs or trestle bases with cross beams.
- Hand-carved details: Add subtle engravings like vines, Celtic knots, or family crests.
- Drawers & storage: Hidden compartments or small drawers with wrought iron pulls add charm.
3. Surface & Finish
- Weathered wood stain: Use dark walnut, oak, or mahogany stain to deepen the color.
- Distressed edges: Light sanding and waxing can create a timeworn effect.
- Beeswax or tung oil finish: Keeps the wood durable while maintaining an old-world look.
4. Hardware & Accessories
- Wrought iron accents: Hinges, drawer pulls, and corner reinforcements with an antique finish.
- Leather inlays: A worn leather writing surface adds a luxurious medieval feel.
- Brass or bronze details: Small metallic embellishments enhance the historical look.
5. Storybook Flourishes
To make it feel straight out of a fantasy novel:
- Candle holders or sconces: Mounted or freestanding for an old-world ambiance.
- Handmade quill & ink set: Perfect for an immersive writing experience.
- Scroll holders or parchment rolls: Display aged paper or maps.
- Secret compartments: Hidden spaces under drawers or in the tabletop for a mysterious touch.
- Book stand or lectern: Ideal for an illuminated manuscript aesthetic.
6. Optional Enhancements
- Engraved runes or symbols: Inscribe meaningful text or medieval motifs.
- Fold-out writing surface: A hinged top or expandable section for versatility.
- Carved drawer fronts: Small detailed carvings of animals, trees, or mythical creatures.
By gathering these materials and tools, you’ll be well on your way to creating a stunning handmade medieval writing desk and medieval writing desk accessories that will transport you back in time.
Preparing Your Workspace and Safety Considerations
As we embark on our medieval desk crafting guide, it’s essential to set up a safe and efficient workspace. This is where the magic happens, and we bring our storybook decor crafting ideas to life. We want to ensure that our workspace is well-ventilated, with proper lighting and minimal distractions.
When it comes to safety considerations, we must think about protective gear, such as gloves and safety glasses. We should also have a fire extinguisher nearby and a first aid kit, just in case. A well-organized workspace is also crucial, with all our tools and materials within easy reach. This will help us stay focused and avoid accidents.

By following these simple tips, we can create a safe and efficient workspace that inspires our creativity and helps us bring our medieval desk crafting guide to life. Whether we’re working on a storybook decor crafting project or simply enjoying some quiet time, our workspace should be a reflection of our personality and style.
How to Make a Storybook-Inspired Medieval Writing Desk & Accessories: Core Construction
The process of building the core structure of your medieval writing desk involves creating the frame, top, and shelves that will bring your diy medieval writing desk to life. To start, gather your materials and tools, and let’s dive into the construction process.
Here’s a blueprint for your storybook-inspired medieval writing desk! It includes:
- A sturdy wooden desk surface with medieval-style charm.
- Thick legs and a cross support beam for stability.
- A central drawer for storage.
- A hidden compartment (marked in red) for a secretive, fantasy feel.
- Aesthetic medieval elements, such as a trestle-style support beam and potential for hand-carved embellishments.

A medieval writing desk tutorial typically begins with the frame, which provides the foundation for the entire piece. You can use wood or other materials to create the frame, depending on your preference and skill level. Once the frame is built, you can move on to creating the top and shelves.
Here are some steps to follow for the core construction:
- Build the frame using your chosen materials and tools
- Create the top and shelves, taking into account the size and design of your medieval writing desk
- Assemble the pieces, ensuring stability and durability
Materials & Construction Steps for a Storybook-Inspired Medieval Writing Desk
This step-by-step guide will help you build your storybook-inspired medieval writing desk with a rustic, old-world charm.
Materials List
Wood Selection
- Desk Surface: Solid oak, walnut, or pine (1.5″–2″ thick for durability)
- Legs & Support: Matching solid wood beams or reclaimed wood for character
- Drawer Front & Secret Compartment: ¾” plywood or solid wood
Hardware
- Wood screws (2.5″ for structural elements, 1.25″ for drawers)
- Wood glue (high-quality for added stability)
- Wrought iron handles or drawer pulls for an antique look
- Hinges for the secret compartment (if using a hidden drawer)
Finishing Materials
- Wood stain: Dark walnut, aged oak, or mahogany
- Beeswax or tung oil (for a hand-rubbed antique finish)
- Carving tools (optional) for engraving designs
- Burnishing tool or sandpaper (120-220 grit) for distressing
Step-by-Step Construction Guide
Step 1: Cutting & Preparing the Wood
- Cut the desk surface to size (approx. 60″ L x 30″ W x 2″ D, adjust as needed).
- Cut the legs from solid beams (approx. 28″-30″ high, depending on preference).
- Cut the bottom trestle beam (approx. 48″ long to fit between the legs).
- Sand all wood pieces to remove rough edges but keep some texture for a rustic look.
Step 2: Assembling the Frame & Legs
- Attach the legs to the tabletop using wood screws & glue. Ensure they are square.
- Install the bottom cross support beam (connect the legs) using screws and mortise & tenon joints if you prefer an authentic medieval technique.
- Optional: Carve or etch designs into the legs and cross support before attaching.
Step 3: Adding the Drawer & Secret Compartment
- Drawer Box: Build a simple wooden drawer with a plywood base and solid wood front.
- Slide Rails: Use wooden drawer slides for an old-world feel instead of metal.
- Install a false bottom in the drawer or create a hidden compartment under the tabletop by hinging a thin wooden panel to lift and reveal storage.
Step 4: Finishing Touches
- Distress the wood by lightly sanding edges and corners.
- Stain the desk with dark walnut, oak, or mahogany for an aged look.
- Apply beeswax or tung oil for a protective, natural finish.
- Attach wrought iron handles & hinges for an antique touch.
- Optional: Burn or carve runes, Celtic knots, or medieval script into the edges.
Optional Enhancements
- A Leather Writing Pad: Attach a leather inlay on the writing surface.
- A Candle Holder or Lantern Stand: Mount a small iron candle sconce.
- A Book Stand or Lectern: Add a slanted panel for holding books or scrolls.
Final Touch
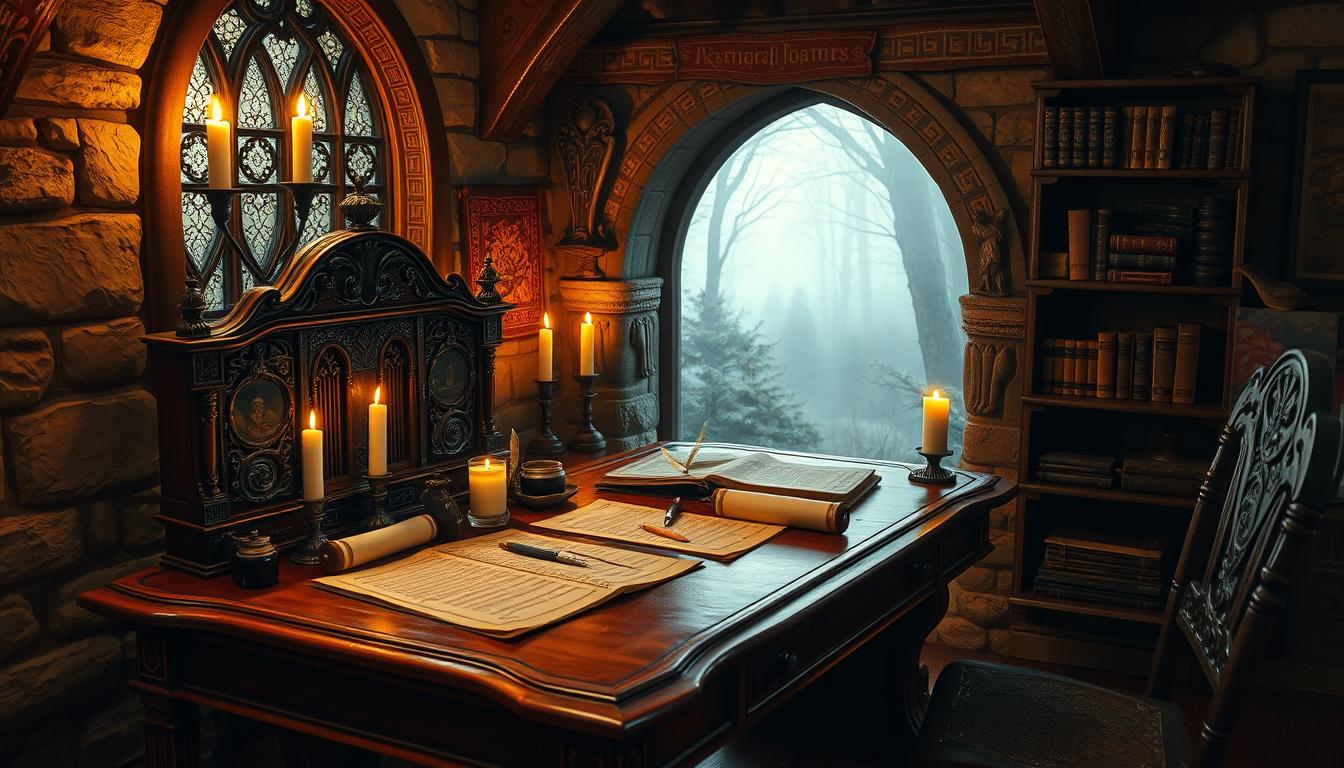
Your storybook-inspired medieval writing desk is now complete! Pair it with a wooden or wrought iron chair, quill pen, and parchment to create the ultimate writing nook.

Remember to take your time and have fun with the process. With these steps and a little patience, you’ll be well on your way to creating a beautiful and functional diy medieval writing desk.
Creating the Distinctive Medieval Desktop Surface
To create a storybook-inspired writing desk, consider using wood stain, paint, or metal accents to give it a unique and authentic look. A medieval writing desk typically features intricate designs and ornate details. You can achieve this by adding decorative elements, such as carvings or metalwork, to your desktop surface.
Some ideas for creating a distinctive medieval desktop surface include:
- Using a combination of wood stain and paint to create a distressed, vintage look
- Adding metal accents, such as brass or copper, to give your desk a touch of luxury
- Incorporating decorative elements, such as carvings or intricate moldings, to add visual interest
By incorporating these elements, you can create a storybook-inspired writing desk that transports you to a medieval world. Don’t forget to add some medieval writing desk accessories, such as a quill pen holder or a parchment paper tray, to complete the look.

Crafting Matching Medieval Accessories
We’re excited to share our ideas for crafting matching medieval accessories to complement your handmade medieval writing desk. A medieval desk crafting guide can be a valuable resource in this process. To start, consider the materials and techniques used in creating your writing desk, and think about how you can apply them to smaller accessories.
Some ideas for medieval accessories include inkwells, quill holders, and decorative boxes. You can use materials like wood, metal, and leather to create these items, and add decorative touches like carvings, engravings, or intricate designs. For inspiration, you can visit medieval collectibles websites or consult a medieval desk crafting guide.
Here are a few tips for crafting medieval accessories:
- Use natural materials like wood and leather to create a rustic, medieval look
- Add decorative touches like carvings, engravings, or intricate designs
- Consider using recycled or repurposed materials to add a unique touch
By following these tips and using your imagination, you can create beautiful and functional medieval accessories to complement your handmade medieval writing desk. Remember to have fun and be creative in the process, and don’t hesitate to consult a medieval desk crafting guide if you need inspiration or guidance.
Authentic Finishing Techniques for Your Medieval Desk
As we near the completion of our medieval writing desk project, it’s time to add the final touches. We want our desk to look like it was plucked straight from a storybook, with a finish that’s both authentic and beautiful. To achieve this, we can use a variety of natural finishes, such as wax, oil, and plant-based dyes. These finishes will not only protect our desk but also give it a unique, distressed look that’s perfect for a medieval-inspired space.
When it comes to storybook decor crafting, the finishing techniques we use can make all the difference. By using natural finishes and traditional methods, we can create a desk that looks like it was handmade by a skilled artisan. Some popular finishing techniques for medieval-style furniture include waxing, oil finishing, and distressing. These techniques can be used alone or in combination to create a truly unique and authentic look.
To get started, we can begin by applying a natural wax or oil finish to our desk. This will help to protect the wood and give it a warm, rich glow. We can then use a variety of techniques, such as sanding or scraping, to distress the finish and create a more authentic, aged look. By following these steps and using natural finishes and traditional methods, we can create a medieval writing desk that’s truly fit for a king (or queen).
With a little patience and practice, we can create a medieval writing desk that’s not only functional but also beautiful and authentic. By using natural finishes and traditional methods, we can add a touch of storybook magic to our home and create a space that’s truly unique and inspiring. Whether we’re looking to create a cozy reading nook or a functional home office, our medieval writing desk is sure to be a stunning centerpiece that sparks imagination and creativity.
Adding Storybook-Inspired Decorative Elements
We love adding those extra touches to our medieval writing desk accessories, making them truly special and unique. When it comes to creating a storybook-inspired medieval writing desk, the decorative elements can make all the difference. With a diy medieval writing desk project, you have the freedom to get creative and add your personal touch.
Some ideas for decorative elements include carvings, moldings, and other ornaments that can add a touch of whimsy and enchantment to your medieval desk. You can also consider adding medieval writing desk accessories such as quills, inkwells, and parchment paper to complete the look.
Here are a few tips to keep in mind when adding decorative elements to your diy medieval writing desk:
- Keep it simple: Don’t overdo it with too many decorative elements. Sometimes, less is more.
- Choose a theme: Stick to a specific theme, such as medieval or storybook-inspired, to ensure your decorative elements fit together seamlessly.
- Have fun: The most important thing is to enjoy the process and have fun with it!
By following these tips and adding your own personal touch, you can create a one-of-a-kind medieval writing desk that reflects your personality and style. Happy crafting!
Bringing Your Medieval Writing Space to Life
As you put the finishing touches on your storybook-inspired medieval writing desk, it’s time to transform your workspace into a captivating writing haven. Infuse your space with authentic medieval ambiance by carefully curating lighting, textiles, and other decorative elements that evoke the enchanting spirit of the past. Soft candlelight, rich fabrics, and antique-inspired accents can all contribute to the immersive atmosphere, allowing you to fully immerse yourself in your medieval writing project.
Drawing inspiration from the beloved Kingkiller Chronicle series, you can surround yourself with symbols of knowledge and the written word, such as antique books, quills, and parchment. Incorporate decorative elements that mirror the University’s restricted Archives, creating a sense of mystery and discovery. By blending practical functionality with storybook-inspired design, you’ll craft a writing space that not only supports your creativity but also ignites your imagination, transporting you to the heart of a medieval world.