
Your cart is currently empty!
How to Make Homemade Butter: Easy Tips for Beginners
•
Ever wondered what it’s like to turn a simple ingredient into something magical? Picture this: a jar of cream, a little patience, and a few minutes of effort. Suddenly, you’ve got golden, creamy butter ready to spread on your morning toast. It’s a process as old as time, yet it feels like a small miracle every time.
Creating your own homemade version is easier than you might think. All you need is heavy cream and a trusty mixer or even a jar to shake it up. As you whip or shake, the cream separates into rich butter and tangy buttermilk. It’s a fun, hands-on experience that connects you to the basics of cooking.
Whether you’re a seasoned cook or just starting out, this recipe is perfect for anyone. It’s a simple way to bring a touch of homemade goodness to your table. Let’s dive in and explore how easy it can be to create something so delicious and satisfying.
Understanding Homemade Butter: Benefits and Basics
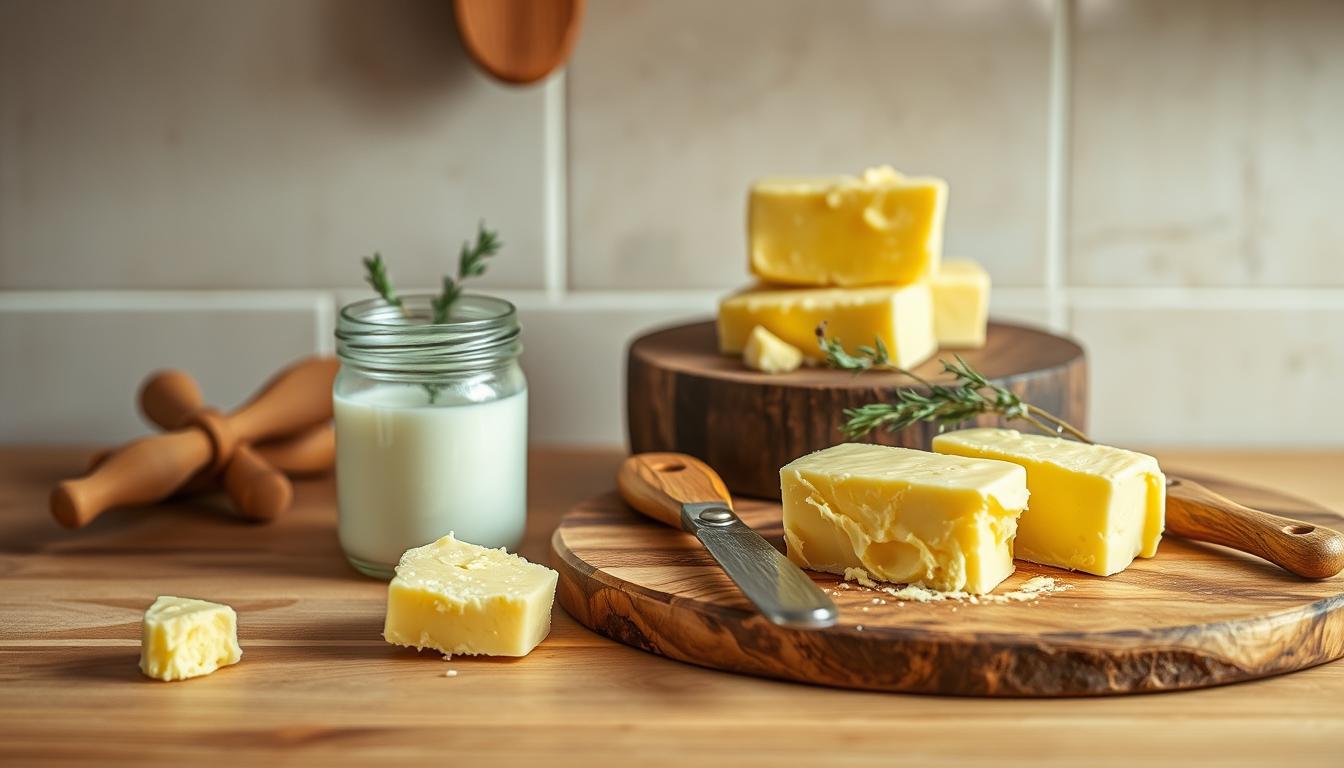
Butter-making is an age-old craft that’s both simple and fascinating. At its core, it’s about transforming cream into a rich, spreadable delight. This process isn’t just practical—it’s a connection to tradition and a way to bring a touch of homemade magic to your table.
The Science Behind Butter Formation
When you whip or shake cream, something incredible happens. The agitation causes the fat molecules to clump together, separating from the liquid. This liquid is buttermilk, and what’s left is pure, golden butter. It’s a natural process that’s as scientific as it is satisfying.
Heavy cream with a fat content of at least 36% works best. The higher the fat, the richer the result. In just a few minutes, you’ll see the transformation unfold—from fluffy whipped cream to chunky bits, and finally, to smooth butter.
Homemade vs. Store-Bought: What Sets Them Apart
There’s a noticeable difference between homemade and store-bought butter. The homemade version is fresher, with a creamier texture and a richer flavor. Plus, you have full control over the ingredients, ensuring it’s free from additives or preservatives.
Store-bought butter often contains stabilizers or colorants, making it more uniform in appearance. But when you make it at home, you get a product that’s uniquely yours. Whether you’re spreading it on toast or using it in a recipe, the taste is unmistakably better.
So, why not give it a try? With just a jar and a little effort, you can create something truly special.
Ingredients and Equipment for Making Homemade Butter
The journey from cream to butter is a delightful mix of science and satisfaction. To get started, you’ll need just a few key ingredients and tools. Let’s break down what you’ll need to create this kitchen staple at home.
Choosing the Right Cream and Other Essentials
The star of the show is heavy cream. Look for a version with at least 36% fat content—this ensures a rich, creamy result. Higher fat content means better texture and flavor. Some recipes also call for a pinch of salt to enhance the taste, but this is optional.
If you’re feeling adventurous, you can use cultured cream for a tangier flavor. Just let it sit at room temperature for 12-24 hours before churning. This step adds depth to your homemade butter.

Essential Tools: Mixers, Food Processors, or Mason Jars
When it comes to equipment, you have options. A stand mixer or hand mixer is the quickest way to make butter. It takes just 5-7 minutes to whip the cream into fluffy peaks, then into butter solids.
If you prefer a hands-on approach, a jar works wonders. Fill it halfway with cream, seal it tightly, and shake vigorously. It’s a bit of a workout, but the process is oddly satisfying.
For those who love efficiency, a food processor is a great choice. It churns the cream into butter in minutes, leaving you with smooth, spreadable results. No matter which tool you choose, the key is patience—and a little elbow grease.
Once your butter forms, don’t forget to rinse it thoroughly to remove excess buttermilk. This step ensures your butter stays fresh longer. Store it in an airtight container or roll it in parchment paper for easy use.
How to make homemade butter for the beginner
Turning cream into butter feels like unlocking a kitchen secret. It’s a process that’s both simple and deeply satisfying. Whether you’re using a mixer or a jar, the transformation from liquid to solid is a joy to witness. Let’s walk through the steps together.

Simple Steps to Transform Cream into Butter
Start by pouring heavy cream into a bowl or your mixer. Begin whipping at a low speed, gradually increasing it. At first, you’ll see soft peaks form—this is whipped cream. Keep going, and the mixture will thicken further.
After a few minutes, the cream will separate into clumps of butter and a milky liquid. This is your cue to stop. The butter solids will gather together, while the buttermilk pools at the bottom. It’s a fascinating process to watch unfold.
Understanding the Role of Buttermilk and Salt
The milky liquid you see is buttermilk, a natural by-product of the process. Don’t discard it—it’s perfect for baking or cooking. Rinse the butter under cold water to remove any remaining buttermilk. This step ensures your butter stays fresh longer.
Adding a pinch of salt is optional but recommended. It enhances the flavor and helps preserve the butter. Simply knead it into the butter after rinsing. The result is a creamy, spreadable delight that’s uniquely yours.
Even if the process seems a bit odd at first, it’s a rewarding experience. With just a little time and effort, you’ll have a batch of fresh, homemade butter ready to enjoy. It’s a small kitchen win that feels like a big accomplishment.
Step-by-Step Guide: From Cream to Butter
There’s something magical about watching cream transform into butter right before your eyes. It’s a process that’s both simple and deeply satisfying. Whether you’re using a mixer or a jar, the journey from liquid to solid is a joy to witness. Let’s walk through the steps together.
Preparing Your Cream and Setting Up Your Equipment
Start by pouring heavy cream into a bowl or your mixer. Make sure your equipment is clean and ready to go. If you’re using a stand mixer, set it to a medium speed. For a jar, fill it halfway and seal it tightly. Room-temperature cream separates faster, so let it sit for a few minutes if it’s cold.
Churning Techniques: Hand Mixer, Stand Mixer, and More
If you’re using a mixer, begin at a low speed and gradually increase it. You’ll see soft peaks form—this is whipped cream. Keep going, and the mixture will thicken further. After about 4-5 minutes, the cream will separate into clumps of butter and a milky liquid. This is your cue to stop.
For a hands-on approach, shake the jar vigorously. It may take 5-10 minutes, but you’ll feel the transformation as the butter forms. A food processor is another efficient option, churning the cream into butter in just a few minutes.
Managing Timing and Consistency for Perfect Results
Timing is key. Over-beating can lead to splattering, so stop once the butter solids gather together. The milky liquid is buttermilk, which you can save for baking. Rinse the butter under cold water to remove any remaining buttermilk. This step ensures your butter stays fresh longer.
For added flavor, knead in a pinch of salt. Store your butter in an airtight container or roll it in parchment paper. It’s ready to spread, bake, or enjoy straight from the jar. For more tips, check out this detailed guide on mastering the process.
Mastering Flavor and Seasoning Your Homemade Butter
Seasoning butter is where creativity meets tradition, turning a basic ingredient into something extraordinary. Freshly made butter is a blank canvas, ready to be enhanced with your favorite flavors. Whether you prefer savory or sweet, the possibilities are endless.
Start by rinsing your butter under cold water to remove any remaining buttermilk. This ensures a pure, clean base for seasoning. Once rinsed, place the butter in a bowl or food processor for easy mixing.
For savory options, try adding minced garlic, fresh herbs like rosemary or thyme, or a pinch of salt. Sweet variations can include honey, cinnamon, or even a splash of vanilla. The key is to balance flavors without overpowering the rich taste of the butter.
Compound butter is another fantastic way to elevate your food. Simply mix your chosen ingredients into the butter, then roll it into a log using parchment paper. Chill it in the fridge, and you’ll have a versatile recipe ready for any serving occasion.
Don’t be afraid to experiment. The beauty of homemade butter lies in its flexibility. Share your favorite combinations with family and friends—it’s a fun way to connect over food and flavor.
Bringing It All Together: Final Thoughts on Homemade Butter
Creating something special in your kitchen doesn’t have to be complicated. With just cream, a jar, and a little effort, you can craft rich, flavorful butter that’s fresher and more satisfying than store-bought versions. It’s a simple process—whip, separate, rinse—and the results are worth every minute.
One of the best parts? You’re in control. Add a pinch of salt for taste or experiment with herbs and spices to create unique flavors. The buttermilk byproduct is perfect for baking, making this recipe a win-win for your kitchen.
Whether you’re spreading it on toast or using it in your favorite food, homemade butter elevates every serving. It’s a small project that fits into any busy lifestyle, offering a rewarding way to connect with your food.
Give it a try—grab a jar, pour in some cream, and enjoy the magic of transformation. Share your creations with loved ones and savor the joy of making something truly your own.
FAQ
What’s the best type of cream to use?
Heavy whipping cream with at least 36% fat content works best. It’s rich and transforms smoothly into butter.
Can I use a mason jar instead of a mixer?
Absolutely! Shaking cream in a mason jar is a fun, hands-on method. It takes a bit more effort but yields great results.
How long does it take to churn butter?
It usually takes about 10-15 minutes with a mixer or food processor. Hand-shaking in a jar might take a bit longer, around 20 minutes.
What do I do with the leftover liquid?
That’s buttermilk! Save it for baking or cooking—it adds a tangy flavor to pancakes, biscuits, and more.
Should I add salt to my butter?
It’s optional, but a pinch of salt enhances flavor and acts as a natural preservative. Add it after churning and kneading.
Can I flavor my butter?
Definitely! Mix in herbs, garlic, honey, or spices for a personalized touch. Experiment and find your favorite combination.
How do I store homemade butter?
Keep it in an airtight container in the fridge for up to two weeks. For longer storage, wrap it tightly and freeze it.
Is homemade butter healthier than store-bought?
It’s free from additives and preservatives, giving you control over ingredients. Plus, it’s fresher and tastes richer!